
When it comes to network security, one of the first things an attacker usually does is try to figure out what operating system you’re running. Tools like Nmap make this super easy with OS fingerprinting — it sends a bunch of weirdly crafted packets to your machine, and based on how your system responds, it can make a pretty good guess about your OS. In this post, I’ll show you how I used Snort in inline mode to block those sneaky Nmap probes. I captured some traffic, broke down how Nmap does its thing, and wrote a bunch of Snort rules to stop it in its tracks. It’s a hands-on walkthrough — perfect if you’re experimenting with intrusion detection systems or just want to level up your blue team skills.
Before we dive in, it’s helpful to have some basic knowledge of:
- How Snort rules work — especially how to match on packet content, headers, flags, and sizes. https://docs.snort.org/start/rules
- How Nmap OS fingerprinting works — the kinds of probes it sends (TCP, UDP, ICMP) and what it’s looking for in the responses. https://nmap.org/book/osdetect-methods.html
Network topology

In this setup, x = 4 and Snort is running in inline mode to actively drop suspicious traffic.
Before Adding Detection Rules
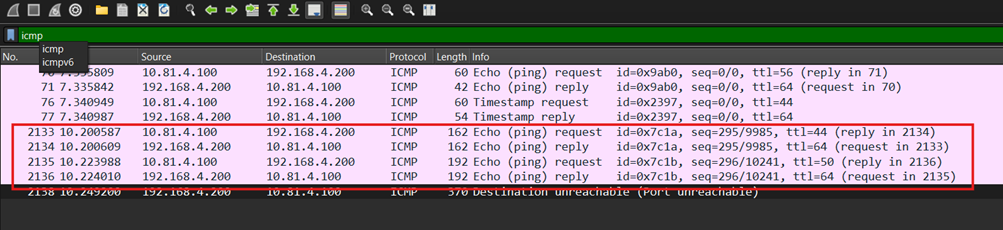
The attacker begins by scanning the victim’s open ports using Nmap. Meanwhile, the victim captures packets using tcpdump for analysis: 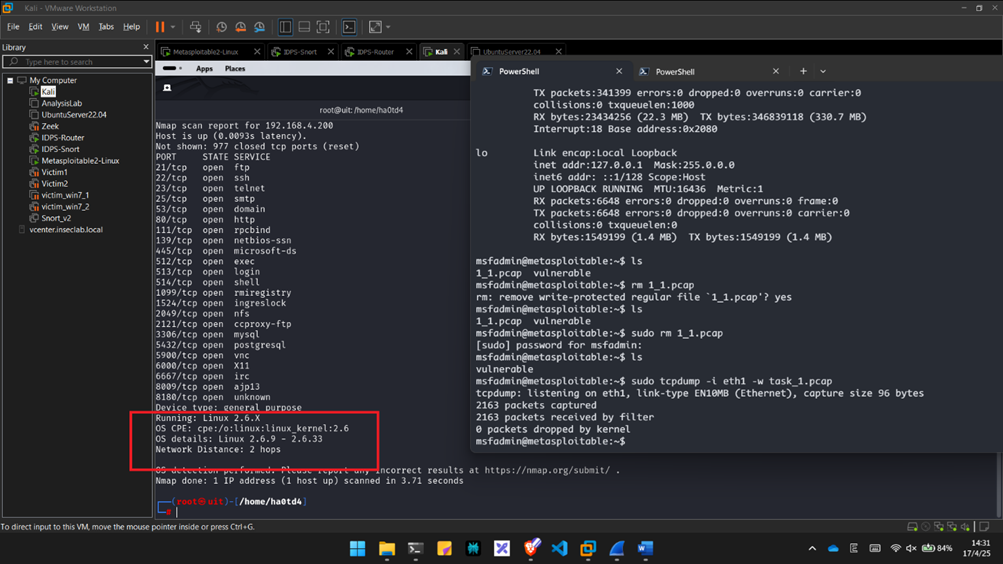
Packet Analysis and Rule Writing
According to the official Nmap documentation, OS fingerprinting works by sending 16 specially crafted TCP, UDP, and ICMP probes to analyze dozens of characteristics from the response packets.
UDP (U1 Probe)
The U1 packet wasn’t captured directly, but we were able to analyze the ICMP error response generated by it: 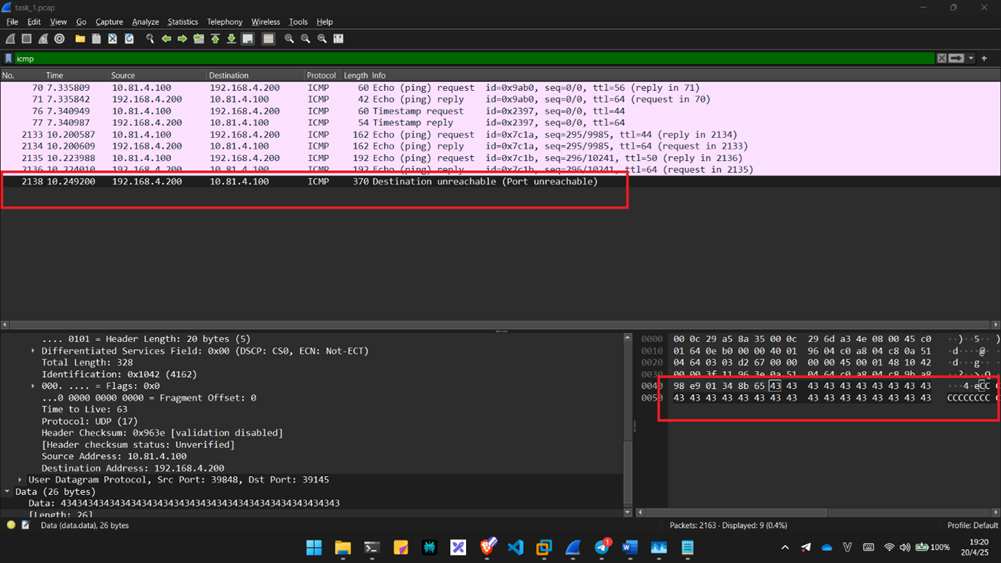 Cross-referencing with Nmap’s documented behavior confirms this packet matches the U1 probe:
  Snort rule to drop U1 packets:
drop udp any any -> any any (msg:"Nmap OS fingerprinting: U1 detected"; content:"|43 43 43 43 43 43 43 43|"; sid:1000015; rev:1;)Result: 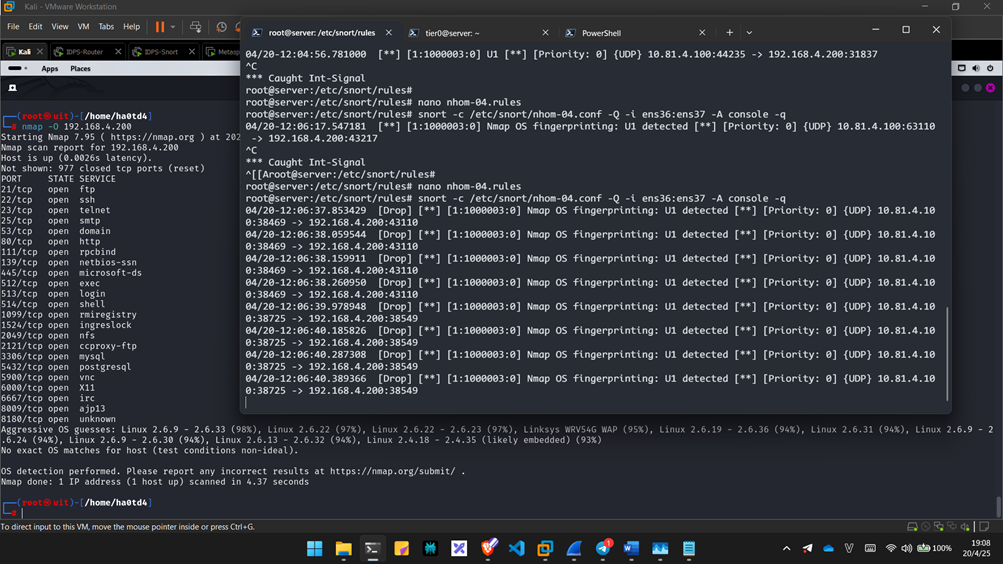 => Successfully blocked the U1 probe, reducing the confidence of Nmap’s OS detection.
Sequence generation (SEQ, OPS, WIN, and T1)
These TCP packets are tricky to detect due to Snort 2’s limited TCP header inspection capabilities. However, they can still be identified using distinct TCP flags and window size values: 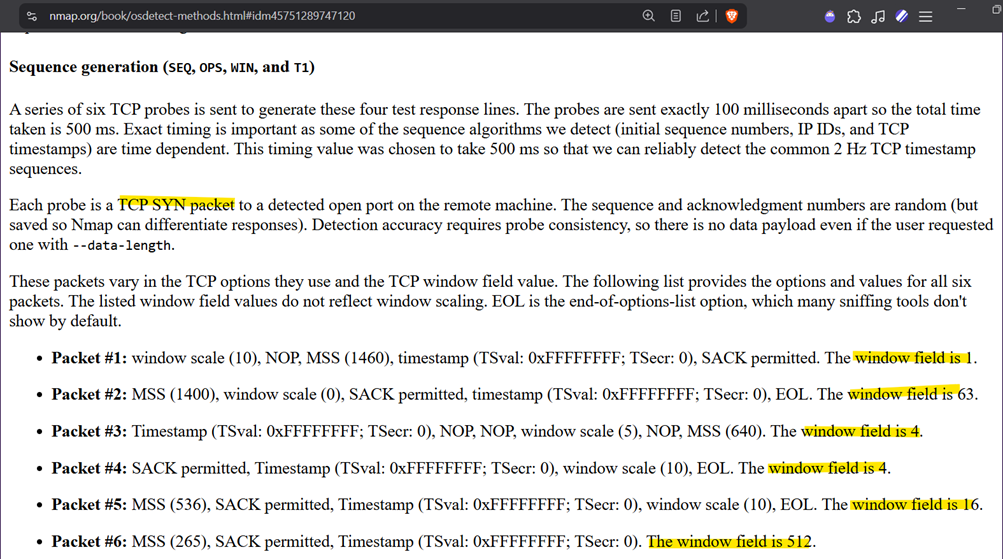
 Rules:
drop tcp any any -> any any (msg:"Nmap OS fingerprinting: SEQ/OPS/WIN/T1 #1 detected"; flags:S; window:1; sid:1000001; rev:1;)

drop tcp any any -> any any (msg:"Nmap OS fingerprinting: SEQ/OPS/WIN/T1 #2 detected"; flags:S; window:63; sid:1000002; rev:1;)

drop tcp any any -> any any (msg:"Nmap OS fingerprinting: SEQ/OPS/WIN/T1 #3#4 detected"; flags:S; window:4; sid:1000003; rev:1;)

drop tcp any any -> any any (msg:"Nmap OS fingerprinting: SEQ/OPS/WIN/T1 #5 detected"; flags:S; window:16; sid:1000004; rev:1;)

drop tcp any any -> any any (msg:"Nmap OS fingerprinting: SEQ/OPS/WIN/T1 #6 detected"; flags:S; window:512; sid:1000005; rev:1;)
ICMP echo (IE):
These echo probes can also be detected by analyzing their size and other fields: 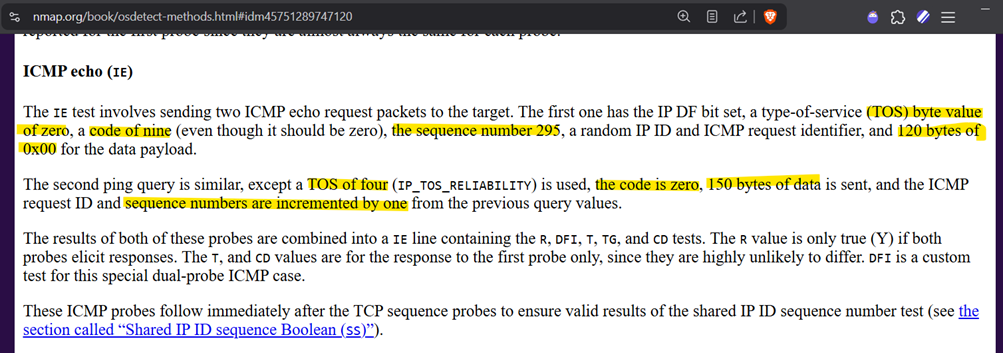
 Rules:
drop icmp any any -> any any (msg:"Nmap OS fingerprinting: IE-1 detected"; dsize:120; icode:9; icmp_seq:295; tos:0; sid:1000006; rev:1;)

drop icmp any any -> any any (msg:"Nmap OS fingerprinting: IE-2 detected"; dsize:150; icode:0; icmp_seq=296; tos:4; sid:1000007; rev:1;)
TCP explicit congestion notification (ECN)
This probe uses unusual TCP flags (SCE) and a very small window size. 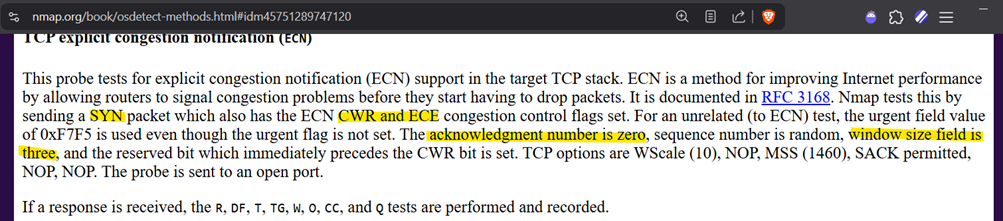
 Rule:
Rule:
drop tcp any any -> any any (msg:"Nmap OS fingerprinting: ECN detected"; flags:SCE; window:3; ack:0; sid:1000008; rev:1;)TCP (T2–T7)
Similar to SEQ probes, these can be detected through their unique flags and window fields: 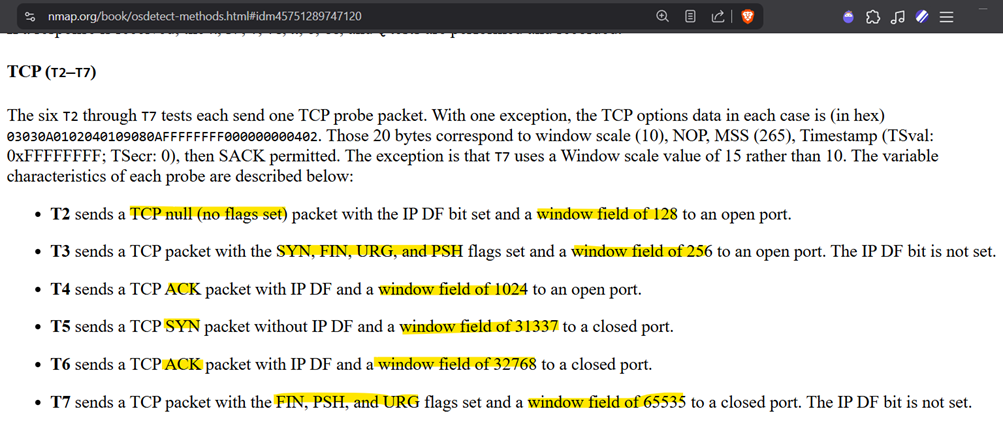
 Rules:
drop tcp any any -> any any (msg:"Nmap OS fingerprinting: T2 detected"; flags:0; window:128; sid:1000009; rev:1;)

drop tcp any any -> any any (msg:"Nmap OS fingerprinting: T3 detected"; flags:SFUP; window:256; sid:1000010; rev:1;)

drop tcp any any -> any any (msg:"Nmap OS fingerprinting: T4 detected"; flags:A; window:1024; sid:1000011; rev:1;)

drop tcp any any -> any any (msg:"Nmap OS fingerprinting: T5 detected"; flags:S; window:31337; sid:1000012; rev:1;)

drop tcp any any -> any any (msg:"Nmap OS fingerprinting: T6 detected"; flags:A; window:32768; sid:1000013; rev:1;)

drop tcp any any -> any any (msg:"Nmap OS fingerprinting: T7 detected"; flags:FUP; window:65535; sid:1000014; rev:1;)
Final Results After Rule Deployment
The combined set of Snort rules effectively blocks all OS fingerprinting probes from Nmap while still allowing legitimate traffic through. Although false positives (FP) or false negatives (FN) could theoretically occur, in this controlled lab environment no such cases were observed. Nmap probes typically contain highly unusual characteristics—such as uncommon flag combinations (e.g., NULL, FIN+URG+PSH) and suspicious window sizes (e.g., 1, 4, 16, 128, etc.)—which makes them easier to detect and filter. 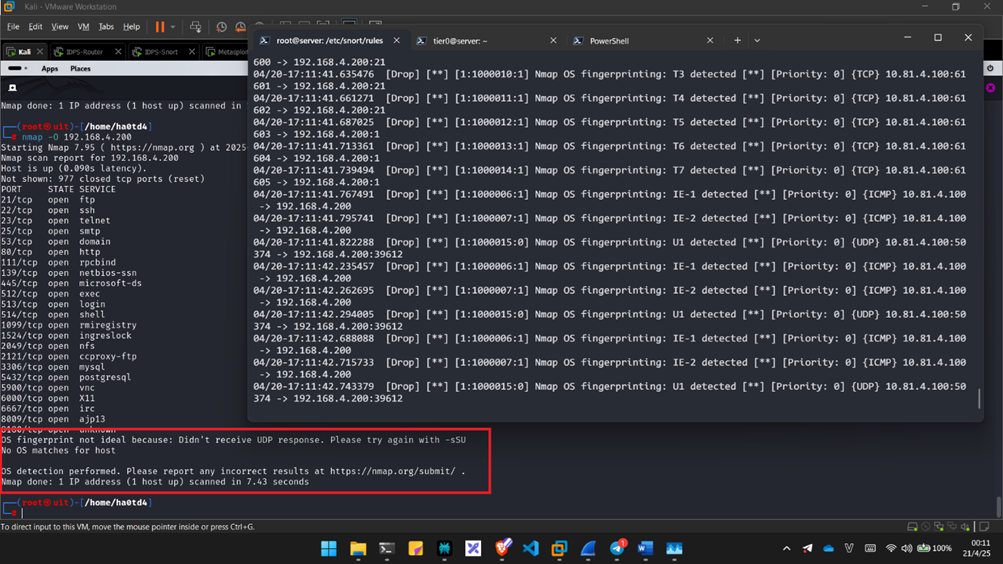
Conclusion
By analyzing how Nmap performs OS fingerprinting and crafting specific Snort rules to block its probes, we can effectively reduce the chances of our systems being accurately profiled. While this setup isn’t bulletproof — attackers can still try different evasion techniques — it definitely raises the bar and makes scanning much more difficult.
Of course, like with any IDS rules, there’s always the potential for false positives or false negatives. In my lab environment, everything worked smoothly, but in a real-world network, you’ll want to monitor the logs and fine-tune the rules as needed.
This was a fun little exercise in both packet analysis and rule writing. Hopefully, it gives you some ideas on how to harden your own network or experiment more with Snort. If you’ve got other tips, tricks, or improvements, feel free to share — always happy to learn more from the community!
Stay safe and keep packet sniffing 🔍💻